Paso 3: Conecte el cable de programación estándar y cargar el código
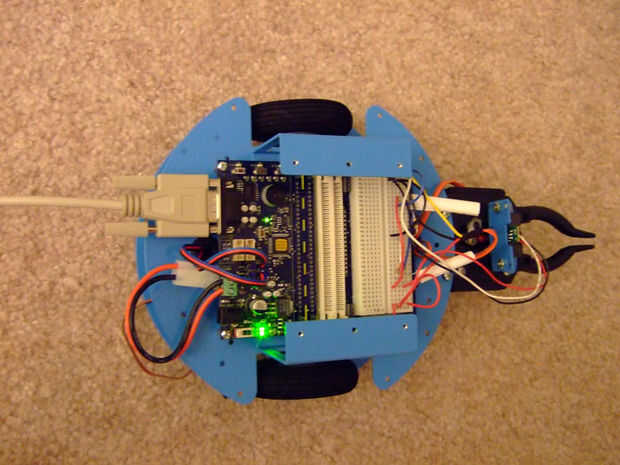
Este código será seguir el movimiento usando los comandos de LF y DF. Se alternar IOLine 7 (conectado a un LED) y el seguimiento LED en la CMUCam del espejo.
'******** serial port related objects ********Dim serialPort As New oSerialPortDim txBuff As New oBuffer27 'change the 27 to make the buffer bigger/smallerDim rxBuff As New oBuffer10Dim serialActive_LED As New oDIO1Dim toggleSerial_Button As New oDIO1Dim toggleSerial_Event As New oEventDim toggleSerial_Wire As New oWireDim serialReceive_Event As New oEventDim serialReceive_Wire As New oWire'******** debug related objects ********Dim statLED As New oDIO1'**********************************************'* Generic Subroutines *'**********************************************Sub main 'initialize everything main_init 'set our output mask to only follow center of mass CMUCAM_setOutputMask(2, 3) 'load our initial difference frame CMUCAM_loadDiffFrame() 'start the difference calculation CMUCAM_startDiffCalc(10)End SubSub main_init 'initialize a status LED statLED.IOLine = 7 statLED.Direction = cvOutput 'initialize our serial port serial_init()End Sub'processes received packetsSub processPacket() Dim mx As Byte Dim my As Byte 'check for both Mx and My to be 0 'granted if they are not 0, the location will be off (ie 'T 12 34) 'but then they won't meet the 0 criteria rxBuff.Location = 2 mx = rxBuff.Value rxBuff.Location = 4 my = rxBuff.Value 'the led should blink in unison with the tracking LED on the camera If (mx = "0") And (my = "0") statLED = 0 Else statLED = 1 End IfEnd Sub'**********************************************'* CMU Cam Functions *'**********************************************'sets the given led to on, off, automatic'param ledNum number of led (0,1)'param val off, on, auto (0,1,2)Function CMUCAM_ledSet(ledNum As Byte, val As Byte) As Byte 'VString wasn't working right in the new compiler... 'not sure about the old one 'txBuff.VString = "L0 0" 'setup our command string manually txBuff.Location = 0 txBuff.Value = "L" txBuff.Location = 1 'the str$ function sucks...so now this is happening txBuff.Value = serial_toChar(ledNum) txBuff.Location = 2 txBuff.Value = " " txBuff.Location = 3 txBuff.Value = serial_toChar(val) txBuff.Location = 4 txBuff.Value = 13 'send the command serial_SendBufferEnd Sub'loads the initial difference frameSub CMUCAM_loadDiffFrame() 'setup our command string manually txBuff.Location = 0 txBuff.Value = "L" txBuff.Location = 1 txBuff.Value = "F" txBuff.Location = 2 txBuff.Value = 13 'send the command serial_SendBufferEnd Sub'starts calculating frame differences'param thresh threshold (0-9)Sub CMUCAM_startDiffCalc(thresh As Byte) Dim tens As Byte 'setup our command string manually txBuff.Location = 0 txBuff.Value = "F" txBuff.Location = 1 txBuff.Value = "D" txBuff.Location = 2 txBuff.Value = " " txBuff.Location = 3 tens = thresh/10 txBuff.Value = serial_toChar(tens) txBuff.Location = 4 tens = thresh/10 txBuff.Value = serial_toChar(thresh-tens) txBuff.Location = 5 txBuff.Value = 13 'send the command serial_SendBufferEnd Sub'sets the output mask'param packetType type of packet to mask (0,1,2,etc) see page 46'param mask mask value to apply (0-255)Sub CMUCAM_setOutputMask(packetType As Byte, mask As Byte) Dim hundreds As Byte Dim tens As Byte 'setup our command string manually txBuff.Location = 0 txBuff.Value = "O" txBuff.Location = 1 txBuff.Value = "M" txBuff.Location = 2 txBuff.Value = " " 'packet type txBuff.Location = 3 txBuff.Value = serial_toChar(packetType) txBuff.Location = 4 txBuff.Value = " " 'mask to apply txBuff.Location = 5 hundreds = mask/100 txBuff.Value = serial_toChar(hundreds) txBuff.Location = 6 tens = (mask-hundreds)/10 txBuff.Value = serial_toChar(tens) txBuff.Location = 7 txBuff.Value = serial_toChar(mask-hundreds-tens) 'carriage return txBuff.Location = 8 txBuff.Value = 13 'send the command serial_SendBufferEnd Sub'**********************************************'* General Serial Subroutines *'**********************************************'initializes the serial portSub serial_init() 'initialize a button to turn on and off the serial port (turn on to run, turn off to program) toggleSerial_Button.IOLine = 5 toggleSerial_Button.Direction = cvInput toggleSerial_Wire.Input.Link(toggleSerial_Button.Value) toggleSerial_Wire.Output.Link(toggleSerial_Event.Operate) toggleSerial_Wire.Operate = cvTrue 'initialize an event to buffer our data serialReceive_Wire.Input.Link(serialPort.Received) serialReceive_Wire.Output.Link(serialReceive_Event.Operate) serialReceive_Wire.Operate = cvTrue 'initialize our RX buffer rxBuff.Location = 0 'initialize our serial port serialPort.Baud = cv9600 'initialize our serial status LED serialActive_LED.IOLine = 6 serialActive_LED.Direction = cvOutput 'wait here until our serial port gets activated While serialPort.Operate = cvFalse WendEnd Sub'copies data into our receive buffer and checks for packet completionSub serialReceive_Event_Code() '.received becomes false when 4byte buffer is empty While(serialPort.Received = cvTrue) 'copy the byte to our buffer rxBuff.Value = serialPort.Value 'check for end of packet If rxBuff.Value = 13 'process packet processPacket() 'reset the buffer to the beginning rxBuff.Location = 0 Else rxBuff.Location = rxBuff.Location + 1 EndIf WendEnd Sub'turns on and off the serial port for programmingSub toggleSerial_Event_Code() If serialPort.Operate = cvFalse serialPort.Operate = cvTrue serialActive_LED = 1 Else serialPort.Operate = cvFalse serialActive_LED = 0 End IfEnd Sub'converts a single digit number to a characterFunction serial_toChar(inVal As Byte) As Byte Dim retVal As Byte Select Case inVal Case 0 retVal = "0" Case 1 retVal = "1" Case 2 retVal = "2" Case 3 retVal = "3" Case 4 retVal = "4" Case 5 retVal = "5" Case 6 retVal = "6" Case 7 retVal = "7" Case 8 retVal = "8" Case 9 retVal = "9" End Select serial_toChar = retValEnd Function' sends the data contained in txBuff' Note: make sure buffer contains a carriage return (13) at the end!!Sub serial_SendBuffer() 'iterate through, sending each byte, end on carriage return txBuff.Location = 0 While 1 serialPort.Value = txBuff.Value ooPIC.Delay = 1 'might not need this 'see if it was a carriage return If txBuff.Value = 13 'break out of our loop Return End If 'go to the next character txBuff.Location = txBuff.Location + 1 WendEnd Sub


. LA forma más fácil de")
 cómic día 2016 libre")
